How to Drill Acrylic Sheet Safely: A Complete Beginner's Guide

Informational

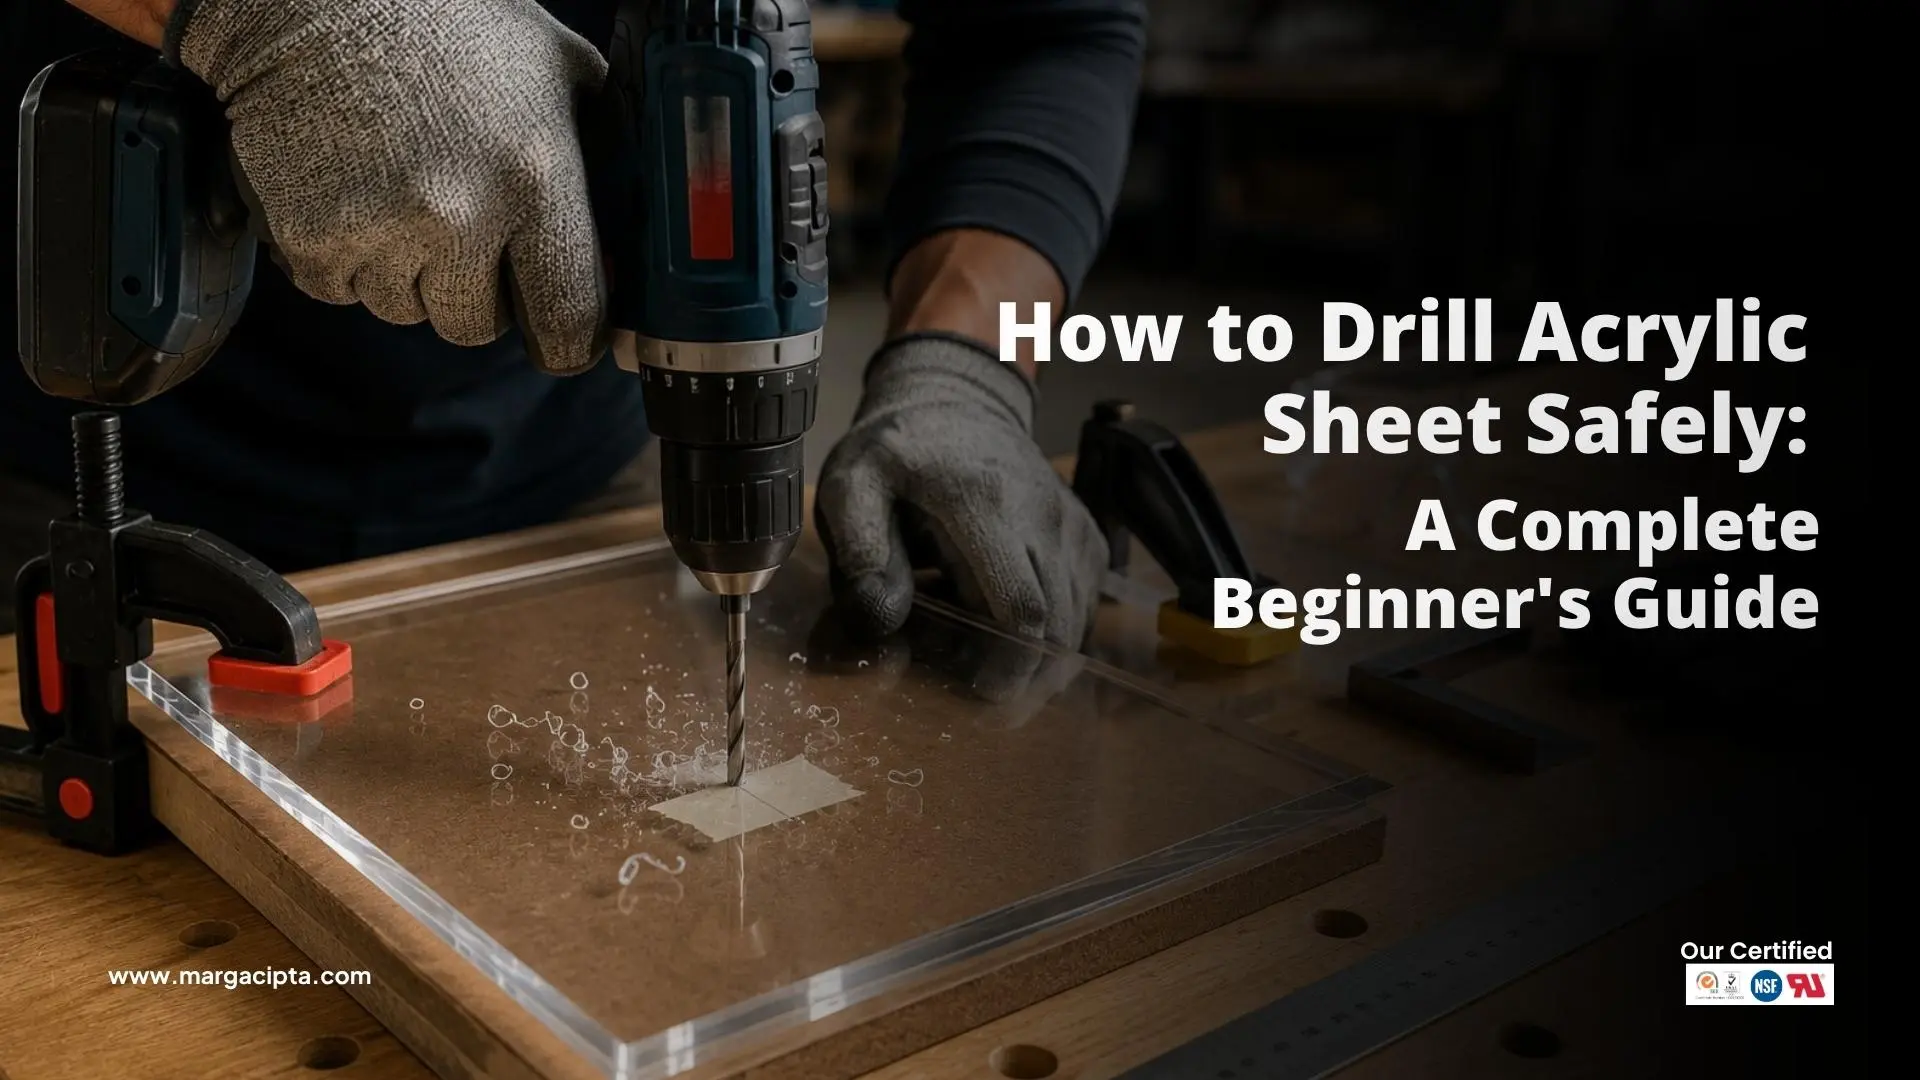
The safest way to drill acrylic sheet is by using the correct drill bit, applying light pressure, and supporting the material properly to prevent cracking or chipping. 

Whether you're fabricating signage, display stands, furniture, or decorative products, proper drilling techniques help achieve clean, accurate holes while preserving the quality of the acrylic.

Fortunately, drilling acrylic is straightforward when the right tools and methods are used.

Can You Drill Acrylic Sheet?

Yes. Acrylic sheets can be drilled successfully using standard drilling equipment, provided the correct technique is followed.

Unlike glass, acrylic is easier to machine and fabricate. However, improper drilling can create stress that leads to cracks or chipped edges.

Using suitable tools and maintaining proper drilling speed greatly reduces these risks.

Read also: Why Does Acrylic Turn Yellow? Causes and Prevention

Tools You'll Need

Before starting, prepare the following:

  • Power drill or drill press
  • Acrylic-compatible drill bit
  • Clamps
  • Wooden backing board
  • Safety glasses
  • Measuring tools and marker

A stable setup helps improve drilling accuracy and protects the acrylic during the process.

Step 1: Mark the Hole Location

Measure carefully and mark the drilling point.

Using masking tape over the drilling area can help improve visibility and reduce surface chipping.

Step 2: Support the Acrylic

Place the acrylic sheet on a flat wooden backing board.

This supports the material and minimizes vibration while drilling.

Never drill acrylic while it is unsupported.

Step 3: Use the Correct Drill Bit

Using an appropriate drill bit is one of the most important factors in preventing cracks.

Specialized acrylic drill bits or modified plastic drill bits typically produce cleaner holes than standard metal drill bits.

Sharp tools also help reduce stress on the material.

Step 4: Drill Slowly

Apply gentle, consistent pressure while maintaining a moderate drilling speed.

Avoid forcing the drill through the acrylic.

Allow the drill bit to remove material gradually rather than generating excessive heat.

Step 5: Finish Carefully

As the drill bit approaches the exit side of the acrylic, reduce pressure even further.

This helps prevent chipping when the hole is completed.

After drilling, remove any dust and inspect the hole for smoothness.

Common Mistakes to Avoid

Many acrylic drilling problems can be prevented by avoiding these common mistakes:

  • Drilling too quickly
  • Applying excessive pressure
  • Using dull drill bits
  • Skipping the backing board
  • Drilling too close to the sheet edge
  • Using damaged or low-quality acrylic

Careful preparation greatly improves the final result.

Why High-Quality Acrylic Matters

Material quality influences fabrication performance.

Premium cast acrylic sheets generally provide:

  • Consistent thickness
  • Better machining characteristics
  • Cleaner drilling results
  • Reduced risk of cracking
  • Professional-quality finishes

Marga Cipta manufactures premium cast acrylic sheets suitable for drilling, laser cutting, CNC machining, engraving, and custom fabrication.

Read also: Laser Cut Acrylic Sheet: Benefits, Applications, and Design Tips

Conclusion

Learning how to drill acrylic sheet safely helps prevent cracks while producing clean and accurate holes for fabrication projects.

By using the right drill bit, supporting the material properly, and drilling at a controlled speed, both beginners and professionals can achieve reliable, high-quality results.

Fabricate with Confidence Using Marga Cipta Acrylic

Marga Cipta offers premium cast acrylic sheets designed for machining, drilling, laser cutting, engraving, and custom fabrication.

For inquiries or orders, email info@margacipta.com.

For product information, inspiration, and the latest updates, follow Instagram @margacipta.


News Release

Acrylic vs Glass for Plaque: Which Material is Better?

Acrylic is generally better than glass for plaque applications.

It offers higher impact resistance, lighter weight, and easier fabrication while still maintaining a clear, premium appearance.

For most commercial and design purposes, acrylic provides a more practical and efficient solution.

Quick Comparison: Acrylic vs Glass

Feature

Acrylic

Glass

Impact Resistance

High (does not shatter easily)

Low (breakable)

Weight

Lightweight

Heavy

Clarity

Excellent

Excellent

Fabrication

Easy

Limited

Cost

More efficient

Higher overall cost

Durability and Safety

Acrylic is significantly more impact-resistant than glass. It does not shatter easily, making it safer for use in offices, public spaces, and high-traffic environments.

Glass, while visually appealing, is fragile and prone to breaking. This can lead to safety risks and higher replacement costs.

Read also: How to Choose UV Resistant Acrylic Sheets for Outdoor Applications

Visual Appearance

Both materials offer a clean and transparent look, but acrylic has a more consistent and modern finish.

Acrylic sheets also provide better results for:

  • UV printing
  • Laser engraving
  • Custom designs

Glass may have a slight tint depending on its composition, while acrylic maintains clearer visual consistency.

Weight and Installation

Acrylic is much lighter than glass, making it easier to handle, transport, and install.

This is especially important for:

  • Large plaques
  • Wall-mounted signage
  • Bulk production

Glass requires more careful handling and stronger support systems due to its weight.

Fabrication and Flexibility

Acrylic is highly versatile and compatible with modern production techniques.

It can be:

  • Cut precisely
  • Engraved easily
  • Printed directly

Glass, on the other hand, requires specialized tools and has limited flexibility for customization.

Cost Efficiency

Acrylic is generally more cost-effective than glass when considering:

  • Material cost
  • Fabrication process
  • Transportation and installation

Its durability also reduces the risk of damage, making it a more reliable long-term investment.

Read also: What Acrylic to Use for Cake Topper: A Complete Material Guide

Why Acrylic is the Preferred Material

For most plaque applications, acrylic offers the best balance between:

  • Durability
  • Aesthetics
  • Practicality

This is why many businesses and manufacturers choose acrylic sheets as their primary material.

Marga Cipta provides high-quality acrylic sheets that are suitable for various fabrication methods, helping ensure consistent and professional results.

Conclusion

In the comparison of acrylic vs glass for plaque, acrylic stands out as the better overall material.

It combines strength, clarity, and flexibility, making it ideal for modern plaque production. For businesses looking for efficiency and reliability, acrylic is the smarter choice.

How to Choose UV Resistant Acrylic Sheets for Outdoor Applications

Acrylic sheets are widely used in outdoor environments because they offer excellent clarity, lightweight properties, and strong impact resistance. However, when selecting acrylic for outdoor projects, UV resistance becomes one of the most important factors to consider.

Without proper UV protection, plastic materials can gradually lose transparency, become brittle, or develop surface discoloration after prolonged sun exposure. This is why many architects, designers, and fabricators choose UV resistant acrylic sheets for outdoor applications.

This guide explains how to choose the right acrylic sheets for outdoor environments to ensure durability and long-term performance.

1. Look for Built-In UV Resistance

The most important feature of outdoor acrylic sheets is UV stability.

UV resistant acrylic sheets are specially formulated to withstand long-term exposure to sunlight without significant degradation. This helps prevent common issues such as:

  • Yellowing or discoloration
  • Surface cracking
  • Reduced transparency
  • Material brittleness

High-quality acrylic sheets can maintain their optical clarity and structural strength for many years, even in outdoor conditions.

Read also: Cost Breakdown: How Acrylic Can Help You Save Budget in Long-Term Projects

2. Consider the Application Requirements

Different outdoor applications require different types of acrylic sheets. Before choosing a material, it is important to understand how the acrylic will be used.

Common outdoor applications include:

  • Outdoor signage and advertising panels
  • Architectural panels and skylights
  • Protective barriers
  • Greenhouse panels
  • Display cases and retail signage

For signage and display purposes, high transparency and surface quality are essential. For structural or protective panels, impact resistance and thickness may be more important.

3. Choose the Right Thickness

Acrylic sheets are available in various thickness options, typically ranging from a few millimeters to much thicker panels for industrial use.

For outdoor applications:

  • 3–5 mm sheets are commonly used for signage and display panels
  • 6–10 mm sheets are suitable for structural panels and partitions
  • Thicker sheets may be required for heavy-duty installations

Selecting the correct thickness helps ensure stability, durability, and resistance to environmental stress.

Read also: How to Identify High-Quality Cast Acrylic Sheets | Buyer’s Guide

4. Evaluate Optical Clarity and Surface Quality

One of the biggest advantages of acrylic over other materials is its excellent optical clarity. High-quality acrylic sheets can offer transparency levels of up to 92% light transmission, which is even higher than glass.

For outdoor branding or display applications, consistent surface quality is essential to maintain a clean and professional appearance.

Poor-quality sheets may have issues such as:

  • Uneven surfaces
  • Distortion
  • Lower transparency

These problems can affect both aesthetics and performance.

5. Choose Reliable Acrylic Sheet Manufacturers

The quality of acrylic sheets depends greatly on the manufacturing process and raw materials used. Reliable manufacturers typically provide consistent thickness, strong molecular structure, and better long-term durability.

For projects that require high performance and stability, cast acrylic sheets are often preferred because they offer better strength, chemical resistance, and fabrication quality compared to lower-grade alternatives.

Conclusion

Choosing the right UV resistant acrylic sheet for outdoor use ensures your project remains durable, visually appealing, and functional for years.

When selecting acrylic sheets for outdoor environments, consider the following factors:

  • UV resistance
  • Thickness and strength
  • Optical clarity
  • Application requirements
  • Manufacturer reliability

By selecting high-quality acrylic sheets designed for outdoor performance, you can reduce maintenance costs and improve the lifespan of your project.

Food Grade Acrylic: Safe Choice for Your F&B Business

When it comes to materials used in the food industry, safety and durability are top priorities. One of the most trusted materials is food grade acrylic

This type of acrylic is specially manufactured to meet strict safety standards, making it suitable for direct contact with food and beverages.

What is Food Grade Acrylic?

Food grade acrylic is a high-quality plastic material that has been tested and certified to be safe for use with food. 

Unlike regular acrylic, it does not contain harmful substances that could contaminate food or drinks. It is also resistant to bacteria, easy to clean, and highly durable.

Read also: Benefits of Using Clear Cast Acrylic Sheet

Is Acrylic Safe for Food?

Yes, acrylic is safe for food as long as it is certified as food grade

Regular acrylic may not always meet safety standards, but food grade acrylic has been tested to ensure it does not leach harmful chemicals or contaminants. 

Always look for products with FDA or NSF certification to guarantee safety in food applications.

Benefits of Using Food Grade Acrylic

  1. Safe for Food Contact
    Certified food grade acrylic complies with international safety standards, ensuring it is non-toxic.
  2. Durable and Long-Lasting
    It is highly resistant to impact and does not easily crack, making it ideal for everyday use in the food industry.
  3. Crystal Clear Transparency
    Glass-like clarity, making food grade acrylic gives excellent visibility, perfect for displays, food containers, or protective covers.
  4. Lightweight and Easy to Handle
    Compared to glass, acrylic is much lighter, making it easier to transport, install, and maintain.

Read also: Do’s and Don’ts: Cleaning Acrylic Sheet the Right Way

Applications of Food Grade Acrylic

Food grade acrylic can be found in various food-related industries, including:

  • Food displays and covers in restaurants and bakeries
  • Storage containers for dry goods or liquids
  • Protective shields for hygienic food preparation areas
  • Tableware and serving trays for commercial or household use

Choosing food grade acrylic ensures safety, durability, and hygiene for any food-related application. 

Looking for high-quality food grade acrylic sheets? MC® Cast Acrylic Sheets are NSF-certified for clear and white opal variants, trusted for consistent quality and safe use in food contact applications.

Contact us on info@margacipta.com for more details.

A Step-by-Step Guide on How to Cut Acrylic Sheet Safely

Acrylic sheets are widely used in industries such as signage, display manufacturing, interior design, and fabrication. Because acrylic is lightweight and easy to shape, it can be cut into various sizes and forms for different applications.

However, cutting acrylic incorrectly may lead to cracking, chipping, or rough edges. To achieve clean and professional results, it is important to follow proper cutting techniques.

This step-by-step guide explains how to cut acrylic sheet properly and safely using commonly available tools.

Step 1: Choose the Right Cutting Tool

The cutting method depends on the thickness of the acrylic sheet.

Common tools used to cut acrylic include:

  • Acrylic scoring knife for thin sheets
  • Table saw or circular saw for thicker panels
  • Laser cutting machines for precise fabrication
  • Jigsaw for curved cuts

For thin sheets under 3 mm, a scoring knife is usually sufficient. For thicker acrylic, power tools are recommended.

Read also: Acrylic Sheet for Interior Design: Modern Applications for 2026

Step 2: Mark the Cutting Line

Before cutting, measure the acrylic sheet carefully and mark the cutting line using a ruler and marker.

To improve accuracy:

  • Use a metal ruler or straight edge
  • Double-check measurements
  • Keep the protective film on the acrylic surface to prevent scratches

Precise marking helps ensure a clean and straight cut.

Step 3: Secure the Acrylic Sheet

Place the acrylic sheet on a stable work surface and secure it using clamps if necessary.

This prevents the material from moving during the cutting process and reduces the risk of uneven cuts.

If using power tools, make sure the sheet is supported evenly on both sides.

Step 4: Cut the Acrylic Slowly

When cutting acrylic, slow and steady movement is important.

For scoring knives:

  1. Score the marked line multiple times using firm pressure.
  2. Move the sheet to the edge of a table.
  3. Snap the sheet carefully along the scored line.

For saw cutting:

  • Use fine-tooth blades designed for plastics.
  • Avoid cutting too fast to prevent melting or chipping.

Read also: How to Identify High-Quality Cast Acrylic Sheets | Buyer’s Guide

Step 5: Smooth the Edges

After cutting, the acrylic edge may feel rough or sharp. To achieve a smooth finish:

  • Use fine sandpaper to polish the edge
  • Apply gradual pressure while sanding
  • Clean the surface after finishing

For professional fabrication, polishing techniques such as flame polishing or buffing may also be used.

Safety Tips When Cutting Acrylic

Always prioritize safety when working with acrylic sheets. Important safety precautions include:

  • Wear safety glasses to protect your eyes
  • Use gloves to avoid cuts from sharp edges
  • Ensure proper ventilation when using power tools
  • Keep hands away from the blade during cutting

These steps help reduce the risk of injury and improve cutting accuracy.

Conclusion

Learning how to cut acrylic sheet properly can significantly improve the quality of fabrication projects.

By using the right tools, marking accurately, cutting slowly, and smoothing the edges, you can achieve clean, professional results without damaging the material.

Whether you are working on signage, display stands, or DIY projects, proper cutting techniques will help you maximize the versatility of acrylic sheets.